

All supplemental radios (those used to bounce packets back to the test radio) must be in either mixed-on or transparent mode. If they are connected to a PC, disconnect the serial cable before testing begins. An idle serial cable can hold DTR# deasserted, which will put the radio in command mode. In command mode, all radio traffic is ignored.


Testing
The Radio Configuration Utility includes two tests:
Transparent Terminal
This test puts the radio into the transparent mode and emulates an old-fashioned terminal.
Any printable characters typed into the terminal window will be transmitted to the default location. Likewise, any printable characters received from the radio will be displayed in the terminal.
No additional error checking (beyond what is normally handled by the radios) is performed on the terminal data. If your system is working properly, you should be able to run the transparent terminal at both ends of the radio link, type in either window, and see the text appear at the other end.
Packet Bouncing
This handy test bounces small, test packets off a radio of your choice. To simplify the test, the packet bouncing test includes a return path in the header so the packets are bounced back automatically, without a need for user code running at the far end of the link. Additionally, this test requests and displays signal strengths of each transmission. The arrows are color-coded to indicate the signal strength.
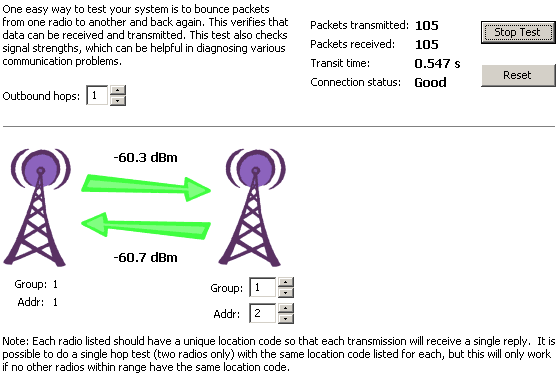
To configure the packet bouncing test, first select the number of hops. To use just two radios (the one connected to the PC and an extra that will bounce the data back), set the number of hops to one.
Next, enter a location code (group and address) for each radio.
Each radio listed should have a unique location code so that each transmission will receive a single reply. It is possible to do a single hop test (two radios only) with the same location code listed for each, but this will only work if no other radios within range have the same location code.
Finally, click the Start Test button in the top-right corner of the test panel. This will begin the transmission of packets and update the statistics and signal strengths as new data becomes available. Clicking the button again will pause the test. Clicking the Reset button will end the test and reset the packet counts.
